
today we build.
You didn’t come this far to stop
can we build it. yes we can.
You've locked your design and the Amazon boxes are piled high on your front porch. Today is the day. Let's build.
WWCD reco. Maybe pour yourself a nice refreshing beverage. This is supposed to be fun. Enjoy the journey, not just the destination.


WWCD reco: Always have a fire extinguisher nearby when you are playing with wires and heat guns. You really don't want to have to explain that 'spicy electrical aroma' to your wife.
go to take it easy. got to take it slow.
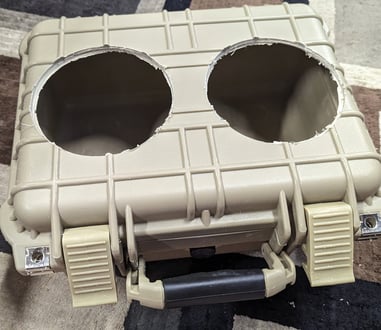
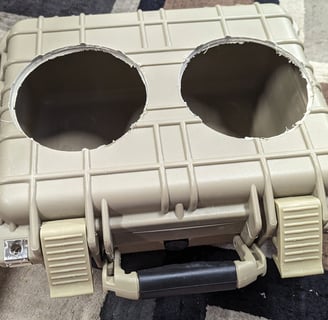
Step 1: Speaker Holes. Measure once. Cut twice. Oops, no, reverse that. Just like high school algebra - check your work.
Match the hole saw to the required speaker hole size. You only get one shot here - so test on a piece of paper or cardboard. The paper can also be used as a template to lay on the box.
Next, place the speaker trim rings on the case. They WILL OVERHANG a bit on the small and medium, but the actual speaker will not. On the small - you can grind or trim the rings a bit where they touch to free up about 0.5".
Determine where the center drill will go and mark it well.
Drill a pilot hole for the hole saw. This will reduce the risk of it slipping.
Hold your breath and proceed slowly. It's just plastic. Slow and steady. Once it cuts through, you can clean the edges up with a box cutter or X-acto blade.
Congratulations - the hardest part is officially over.
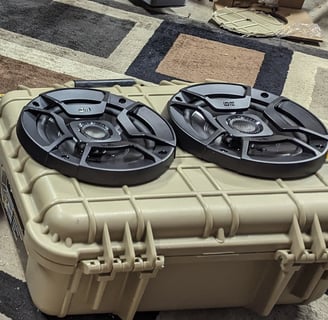
Step 2: Place the innards.
Use velcro to hold the battery where you want it. We suggest keeping the battery on lowest part of the back of the case. This counterbalances the heavy speaker magnets and keep the box from face-planting.
Repeat with the amp.
Well done. Just like calling 811, you now know the 'no-drill' zones.


Step 3: Blowholes, USB ports & battery holes.
Carefully plan out the best locations for the blowholes and any external power buttons, USB ports, etc. Remember to check all internal clearance so you don't drill into battery / amp + the lid will still close!
Use a drill bit for a starter hole in the exact center.
Now, use your step drill to enlarge the hole. Do this a little at a time from the outside, then the inside so that the hole is uniform. Keep testing every few rotations to see if the part fits. The best is when it's really tight and needs to thread into the plastic.
If you go to far, you're gonna be ok. We'll just fix that with the amazing GE caulk you got.
Step 4: Insert the speaker.
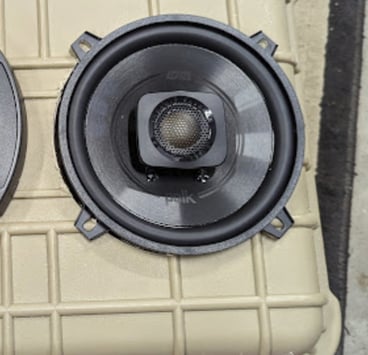

Carefully insert the speakers. You'll likely have to tilt them in since one side has the wire connectors.
Push them towards the edge of the box if there's any room.
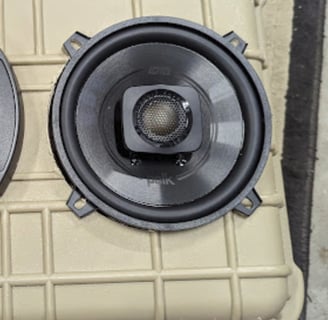
Rotate them until the Polk branding is level and aligned.
Now add the rings and triple check alignment. Once satisfied, use a permanent market to carefully mark the 4 screw holes on the first speaker.
Drill pilot holes and then screw in the first speaker, with the ring. We're going to take them apart in a few minutes to caulk - so just snug is good. [No need to use the metal retaining clips since we're going to us the GE magic to seal them.]
Lather, rinse and repeat with the second speaker.
Stand back, call the wife and kids and take a bow. You got this.
Step 5: Drill the blowhole & install the pluggers
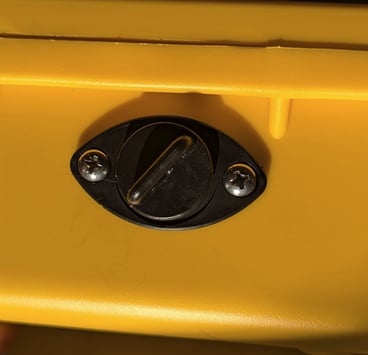
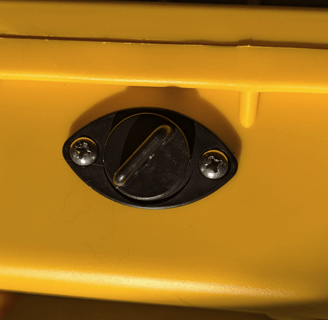
If you are using drain plugs - just drill 2 pilot holes for the screws and barely tighten. We'll remove later when we do the final GE caulker seal.
Note - The stainless steel screws that come with the plugs / rod holders are likely a bit too long. You can hacksaw them or use a grinder to make them flush. Or, if you have always wanted to know what it felt like to be a shish kebab, one of those rogue screw points will certainly give you a very specific, and painful, answer at a random time in the future.
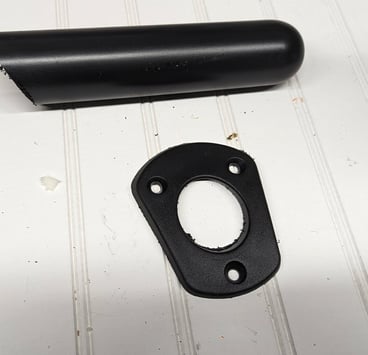
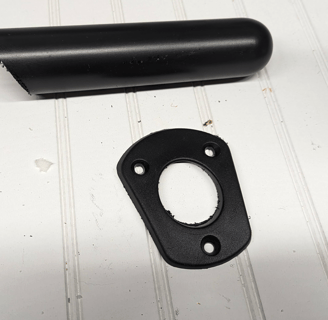
If you are using the fishing rod holders - cut off the tube and keep the 3 hole mounting plate. You may need to sand or file down any rough spots so it sits flush on the case. Drill 3 pilot holes for the screws and barely tighten. We'll remove later when we do the final GE caulker seal.


Step 6: Optional switches, battery meter,...)
Maybe you will. Maybe you won't. No judgement here.
If you poked other holes in the case for a switch, etc - now is the time to get them installed. Most are threaded - so slowly turn them and thread into the case. Pro-tip: Righty tighty not lefty loosey.
Don't over do it - like all of their friends, they're getting calulked later.
Step 7: Wire it up. Speakers.

The Polks come with wiring harnesses for each speaker. The ends have clips that slide onto the speaker terminals. One is large, one small. They each have a + or - sticker. Once clear - move to step 2.
You have a few choices depending on the length of wire needed to reach the amp. In many cases, you can just remove the amp side connector and use a heat shrink butt connector to connect it to the Polk wire. If you need more length - you can either use the amp extension wire - or add in a section of the GS Power wire.
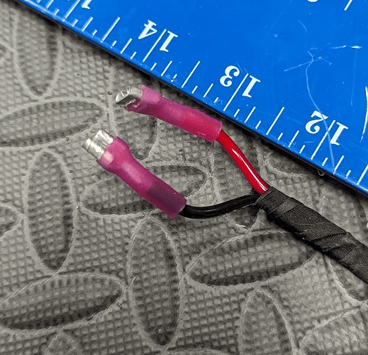
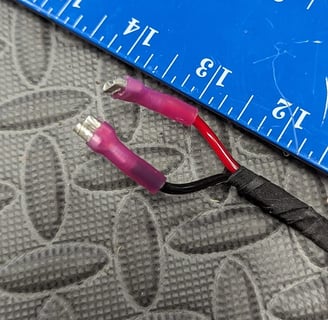
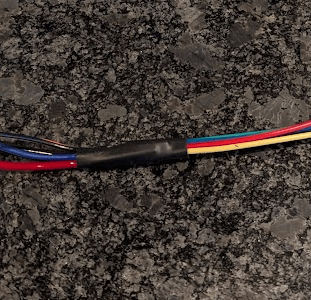
WWCD reco: Really, really, any of the options above work great - but if you're going for the best - we scrap the Polk wires - add GS Power directly to the amp wires with the butt connectors - and then add slide on connectors (like the photo)or solder to the speakers.
WWCD Bonus Reco: When you're sealing up all of the parts with the GE caulk - cover the speaker to wire connections with a dab. This holds them nice and tights and prevents any movement in transit or as you open / close the case. Smooth it all out to make it look better than the mess we made here...


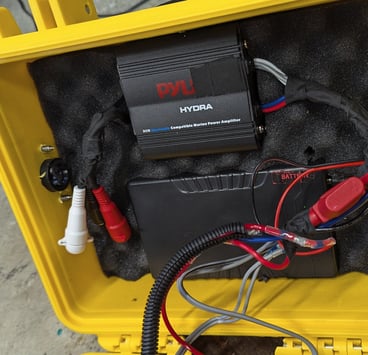
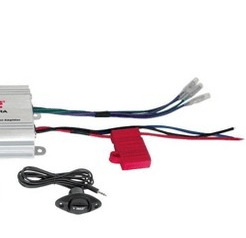
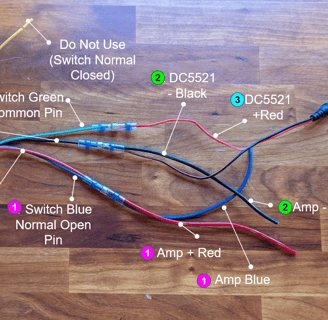
Step 7.3: Wire it up. Power.
Skip our napkin drawing and scroll down to the good stuff.
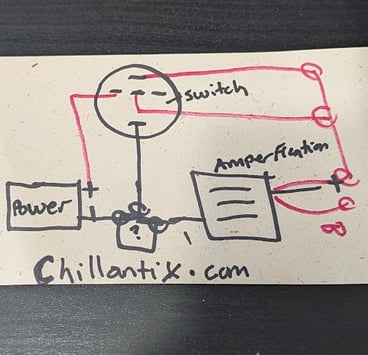

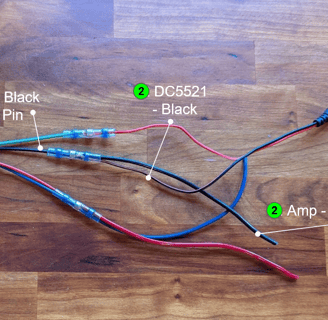
If a picture is worth 1.000 words, then we just saved like almost 4,000ish. Click the images to enlarge and see all of the connections. Some got cropped out in the small view - but you need em all in super-size. As long as you can count to 5, you should breeze though these 4 steps.
WWCD reco: Don't forget to slide the butt connector onto one of the wires before you splice them together - or you'll need to start again (so we've been told).
WWCD reco: You can put big heat shrink tubing over the wires from each source BEFORE you begin - and then use to cover and hold all of the connections together.
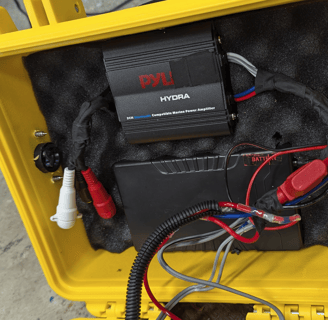
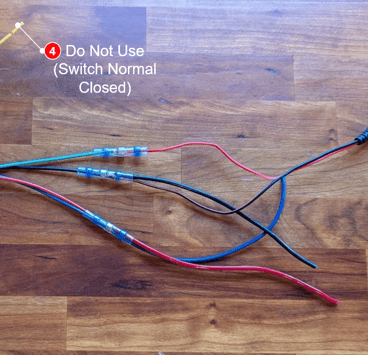
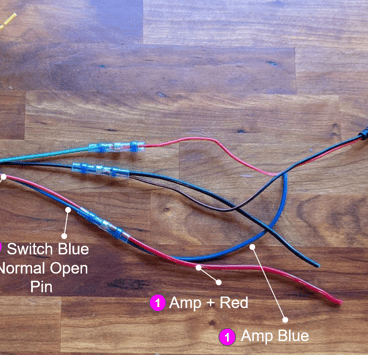
Use a heat shrink butt connector to connect the red & blue from the amp to the red & blue from the switch (Normal Open Pin and LED + Pin). All 4 are connected together as one - don't connect red to red, blue to blue.
Measure all of your wires and see if any need to be extended for the case to easily open and close. If they do - grab a chunk of the GS Power wire and use a heat shrink butt connector to splice them. Problem solved.
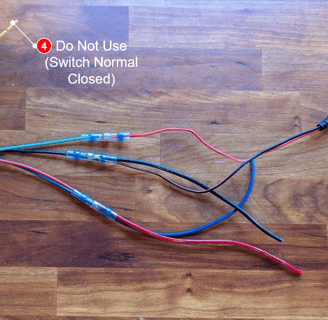


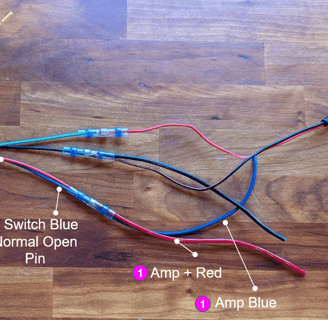
Use a heat shrink butt connector to connect the red from the DC5521 power adapter to the green switch Common pin.
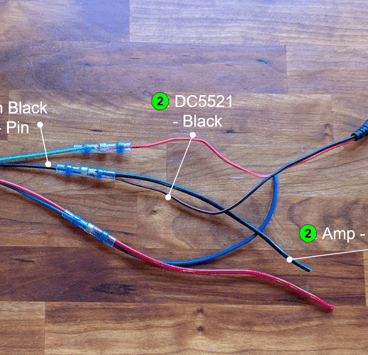
Use a heat shrink butt connector to connect the black from the DC5521 power adapter to the black switch LED - pin and the black - from the amp.
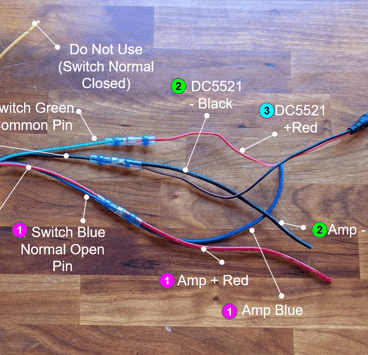
You don't need to count to 4. You are done. Leave Mr. Mellow Yellow all alone. He likes it that way.
4.5 Now is the time to toast up the optional heat shrink tubes. This adds more strength, organizes the spaghetti and makes it easier to add the wire loom.
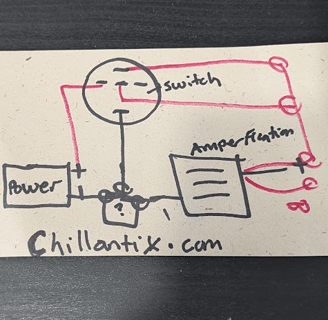
Bonus image of all the steps together. Sweet.
Step 8: Test, this is only a test.
Another moment of truth. We recommend selecting 'disco inferno' as your inaugural tune. Hopefully, the only flames will be the sick beats setting the dance floor on fire, not your actual wiring.
WWCD reco: Always have a fire extinguisher nearby when you are playing with wires and heat guns. We're guessing that you ignored us the first time. Maybe reconsider now?
Open the blowholes.
Turn on the battery power switch.
Press the external power button if you added one.
Go to Add Bluetooth device on your phone and scan for "Pyle".
Add the device and rename it 'Chillantix'. Come on, all your friends are doing it.
Fire up Spotify and pick one of your go to vibes.
Use the in app equalizer to round out the bass and treble. As Jaya said 'here come the drums!'


Step 9: Name the beast.
What's it gonna be? Sir Beats-a-Lot? Squirrel Blaster? Let your creativity run wild and name it like your first child.
If you send us a photo of your masterpiece and it's birth name - we'd be glad to drop you a customized name sticker to officialize it's new ID.

Our builds include the Crop Duster, Electric Pumpkin, Lemon Pound Cake and let us not forget the Atomic Mudpie (aka MiniMe).
Disclaimers & Fun Stuff
CHILLANTIX LLC AFFILIATE STATEMENT
All the ideas and guides are free - but please do help us by using our affiliate links. As an Amazon Associate we earn from qualifying purchases.
PROCEED AT YOUR OWN RISK
The information provided on this website is for entertainment purposes only. It is not intended to provide professional advice, including but not limited to mechanical, electrical, legal, financial, medical, or any other type of advice. The content should not be interpreted or relied upon as such.
No liability is accepted for any actions taken, or not taken, based on the information presented on this website. Any reliance you place on such information is therefore strictly at your own risk. You are solely responsible for any consequences that may arise from your use of this website or its content.
Connect
Have any questions or ideas?
Chillantix LLC
Discover
contact@chillantix.com
Chillantix LLC - © 2025. All rights reserved.